Pouring & Technique
How to Center a Candle Wick
Learn how to center a candle wick every time using wick stickers, centering bars, and a few simple techniques that take less than a minute to set up.
A candle with an off-center wick burns unevenly, pools wax on one side, and can leave a full inch of unmelted wax around the edges by the time it reaches the bottom of the jar. Most beginners assume this is a wax problem, but it almost always comes down to the wick moving during the pour or shifting as the wax cools. Fortunately, centering a wick takes less than a minute and requires no special equipment beyond a few supplies you probably already have on your workbench.
This guide walks through the most reliable methods for keeping a wick exactly where you put it, from the moment you prep your jar all the way through to when the candle has fully set.
Why a Centered Wick Matters
When a wick sits slightly to one side, the melt pool forms around it rather than across the full diameter of the vessel. One side melts down quickly while the other stays solid. Over several burns, this creates a lopsided tunnel in the wax that wastes a good portion of your fragrance load and leaves thick, unmelted walls standing long after the wick burns out.
A centered wick gives the melt pool the same distance to travel in every direction. That balanced burn is what creates a clean, even melt pool that reaches the edges within the first few hours of burning. It also makes your finished candles look more polished, which matters when you are making them as gifts or planning to sell at a market.
What You Need to Center a Wick
You do not need a dedicated tool for this, though a few inexpensive items make the job much easier:
Wick stickers (also called wick-centering dots or wick tabs). These are small adhesive dots that press onto the bottom of a wick tab and stick the tab firmly to the inside bottom of your jar. Without them, the wick tab can float upward when hot wax hits it. Wick stickers cost almost nothing and solve one of the most common first-pour problems.
A wick centering bar or wick holder. This is a flat bar with a notch or hole in the center that rests across the top of your jar and holds the wick upright while the wax sets. You can buy these as plastic or metal bars, or improvise one with a wooden skewer and a rubber band, two pencils taped together, or even a folded piece of cardboard.
Scissors and a ruler or pen. You will want to trim your wick to a length that makes it easy to hold in place, and marking the center of your jar before you pour can help you line things up quickly.
How to Set Up Your Wick Before You Pour
Getting the wick positioned correctly before any hot wax enters the picture is the most important step. Here is the order that works reliably:
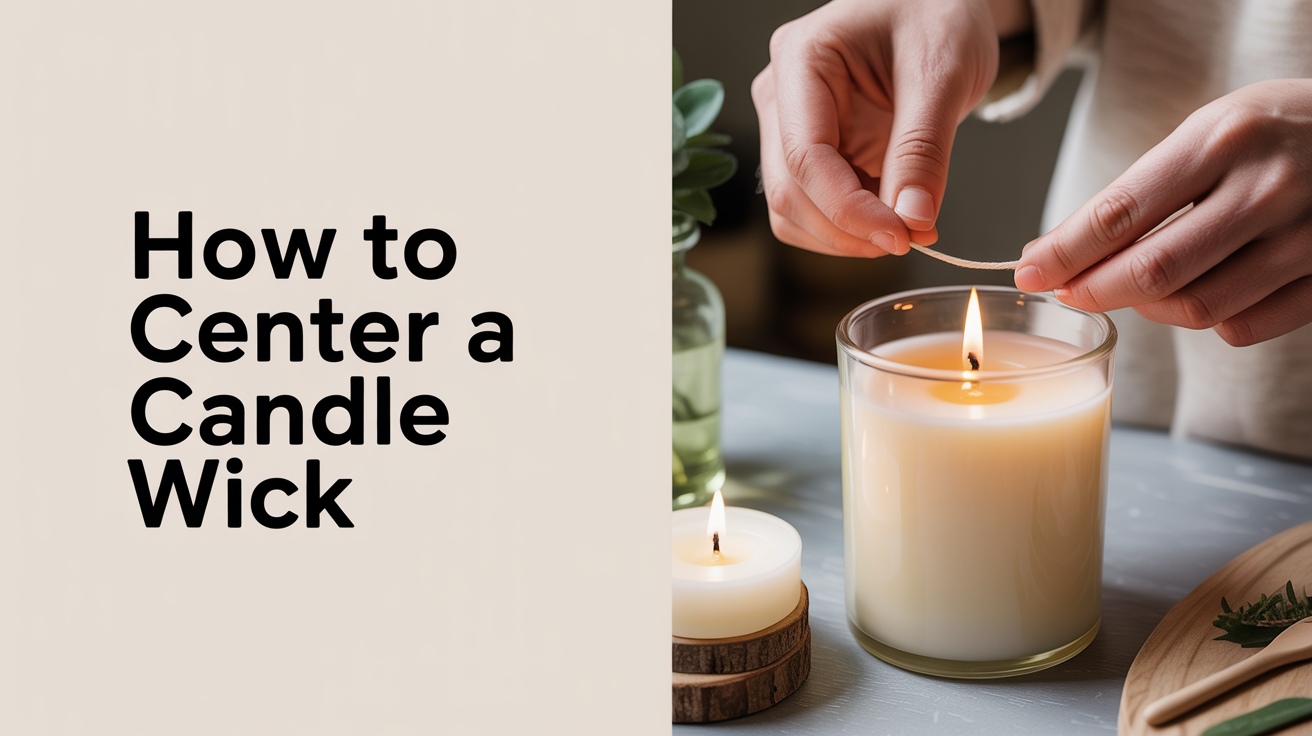
Step 1: Secure the wick tab to the jar. Press a wick sticker onto the metal tab at the base of your pre-tabbed wick. Then lower the wick into the jar and press the tab firmly onto the center of the jar bottom. Hold it down for five to ten seconds so the adhesive bonds to the glass. If you do not have wick stickers, a small dot of hot glue works as a substitute, but let it cool completely before pouring or it can release when the wax heats the glass.
Step 2: Find the center visually. Look straight down into the jar from above and check that the tab is sitting in the middle. For round jars, this is easy to judge by eye. For square or rectangular containers, use a ruler to mark the center point on the outside of the glass with a dry-erase marker or a small piece of tape. That reference point helps you place the tab accurately even before you pick up the wick.
Step 3: Lay your centering bar across the top of the jar. Thread the wick up through the center notch or slot in your holder. Pull the wick gently taut so there is no slack, then rest the bar on the rim of the jar. The wick should stand straight up without leaning. If it leans, adjust the tab at the bottom before you pour.
Step 4: Trim the wick. Leave about a quarter inch (6 mm) above the centering bar for now. This keeps the wick from flopping over once the wax goes in. You will trim it to the proper burn length after the candle has fully set, usually to about one-quarter inch (6 mm) above the finished wax surface.
Before you pour, check your wax temperature. Most soy waxes pour cleanly between 120 and 140 degrees Fahrenheit (49 to 60 degrees Celsius), and paraffin blends often pour a little hotter. You can find a full breakdown of pour temperatures by wax type in the guide to candle pouring temperature. Pouring too hot can loosen the wick sticker before the tab has time to bond with the glass.
Keeping the Wick Centered While the Wax Cools
Once you pour, the hard part is already done if your setup is solid. A few things can still go wrong during the cooling phase, though.
Pour slowly and steadily. A fast pour creates turbulence that can knock a wick off-center even when the tab is well secured. Pour in a thin, controlled stream aimed at the side of the jar rather than directly at the wick, especially for the first inch or two of wax.
Do not move the jar. Set it on a flat, level surface and leave it there until the wax has fully hardened. Moving a jar while the wax is still liquid can shift the wick tab if the adhesive has not fully cured in the heat.
Check the wick position before the wax skins over. In the first few minutes after pouring, before a skin forms on the surface, you can still nudge a slightly off-center wick with a skewer or the tip of a pencil. Once a skin forms, trying to move the wick will leave visible marks or create an uneven surface. If you need a level top, the guide on how to get a smooth candle top covers the techniques for fixing surface issues without disturbing the wick.
Leave the centering bar in place. Keep the bar sitting on the rim of the jar until the wax is fully opaque and cool to the touch. This typically takes two to four hours depending on the wax type and room temperature. Removing the bar too early can let the wick lean as the wax contracts.
For a complete walkthrough of the full pour process, including how to handle second pours when sinkholes appear, see the step-by-step guide on how to pour a soy candle.
What to Do If Your Wick Has Already Drifted
Sometimes you inspect a finished candle and realize the wick is clearly off-center. How far you can correct it depends on the stage of the candle.
If the wax is still liquid: Act quickly. Use a wooden skewer to gently reposition the wick tab at the base. This is easier to do in a wide-mouth jar than a narrow-neck container. Reset the centering bar and let the candle cool undisturbed.
If the wax has firmed but is still soft: Carefully insert the tip of a skewer alongside the wick, all the way to the bottom. You can sometimes use it as a lever to nudge the tab slightly toward center. The wax surface will show marks, but this can be fixed with a heat gun or a second thin pour over the top.
If the wax has fully hardened: At this point, a slightly off-center wick is usually not worth trying to fix physically. Burn the candle to see how far off the melt pool actually sits. A wick that is one-eighth of an inch (3 mm) off-center often burns acceptably and reaches the edges by the second or third burn. Only if the wax is pooling very one-sidedly is it worth melting the candle down and starting again.
Frequently Asked Questions
Do I really need wick stickers, or can I skip them? You can skip them, but you will notice the difference. Without something holding the wick tab in place, hot wax can float the tab upward as you pour, or the wick can lean once the wax begins contracting as it cools. Wick stickers are inexpensive and available from any candle supply shop. Hot glue works as a substitute in a pinch, but it must be fully cool before the wax goes in.
Can I use a regular pencil instead of a wick centering bar? Yes. Rest two pencils parallel across the top of the jar, with the wick running between them. Wrap a rubber band around each pencil where it contacts the jar rim to stop them from rolling. It is not as tidy as a proper bar, but it holds the wick straight just as well.
Why does my wick keep moving toward the side of the jar as the wax cools? Wax contracts as it solidifies, and it contracts toward the center of the jar. If your wick tab was placed slightly off-center or the adhesive bond was not strong enough, the contracting wax can pull the wick off to one side. The fix is to press the wick tab down firmly before pouring and pour at the lower end of the recommended temperature range so the adhesive is not stressed by excessive heat.
How do I center a wick in a jar with a narrow neck? Use a thin bamboo skewer or a straightened wire to lower the wick tab into the jar and press it flat against the center of the bottom. A wooden skewer can double as the centering bar by resting across the jar's opening with the wick taped or knotted to it at the center point. This takes a bit more patience than working with a wide-mouth jar, but the same principles apply.
My candle burned down and the wick was centered, but one side still has more leftover wax than the other. What happened? This is often a drafts problem rather than a wick-placement problem. Air movement from a vent, a fan, or an open window pushes the flame to one side and creates an uneven melt pool over time. Try burning the candle in a draft-free spot to see if the burn evens out. A wick that is very slightly off-center or a wick that is undersized for the vessel can also cause this.